Integration: Google Cloud Platform (GCP)
Use this integration to evidence from your Google Cloud Platform (GCP) environment
Written By Micah
Use Terraform & Scripts - Google Cloud Platform to collect evidence from your Google Cloud infrastructure.
With our GCP integration, you can collect evidence of your Google Cloud configurations directly from your cloud environment. This integration offers two flexible, low-code collection methods — Terraform data blocks and Script Runner — allowing you to customize what evidence is collected from your cloud systems.
Note: If you only see a single Terraform tab (no Scripts tab), your organization may not yet have Script Runner enabled. Reach out to your Customer Success Manager to request access.
Types of evidence you might collect
There are a lot of different types of evidence you can collect from Google Cloud. The flexibility of this integration is limited only by what is available from either the Terraform GCP provider, or what is accessible via the GCP APIs and CLI.
Important note: You do not need to use Terraform in your tech stack in order to use this integration to collect evidence.
Here is a short, non-exhaustive list of some of the possible evidence you may collect:
Compute Engine information
Cloud IAM policies and service account configurations
Cloud SQL database settings
Cloud Storage bucket configurations
Kubernetes (GKE) cluster configurations
Cloud KMS key management settings
VPC and networking configurations
Follow the instructions on this page to get started.
Configuring the Integration
To configure the GCP integration, you (or someone in your organization) will need access and permissions to configure Workload Identity Federation in the GCP project where your resources are configured. Through this setup you can generate the credential configuration that will give Strike Graph permission to read information from your Google Cloud resources.
Get started by navigating to the Integrations Manager in Strike Graph and opening the Terraform & Scripts - Google Cloud Platform integration. Note: if you do not see this integration listed, it may not be available for your organization or role yet; reach out to support or your Customer Success Manager to request access.
Click the + Connect button to begin configuring a new integration.
Setting up Workload Identity Federation in GCP
In your GCP console, you'll need to configure Workload Identity Federation to allow Strike Graph to authenticate to your account and collect evidence from your Google Cloud systems.
From your Google Cloud Console:
1. Select or create a project
Select or create the specific project you are trying to connect to Strike Graph's GCP integration. The resources you expect to read from for evidence collection will need to be within this project.
While you're on the Home Dashboard for your project, jot down the project number (not the project ID), because you'll need that later.
2. Enable the required APIs
Enable the following APIs for your project: IAM API, Cloud Resource Manager API, IAM Service Account Credentials API, and Security Token Service API. You can search for each in the APIs & Services > Library section of the console, or enable them in bulk using the gcloud CLI.
3. Create a Workload Identity Pool and Provider
In the Google Cloud Console, navigate to IAM & Admin > Workload Identity Federation.
Click Create Pool, give it a name (e.g.,
strike-graph-gcp-integration), and ensure the pool is Enabled. Click Continue.Under Add a provider to pool, configure the following:
Select a provider: Choose AWS
Provider name: Enter a descriptive name (e.g.,
sg-aws-gcp)AWS Account ID: Enter Strike Graph's account ID:
446556517851
Note somewhere your pool's ID, you'll need that later.
Click Continue, then Save — you can skip the "Configure provider attributes" step.
4. Create a service account
Navigate to IAM & Admin > Service Accounts, then click Create Service Account.
Give it a descriptive name (e.g.,
strike-graph-integrations-service-account) and click Create and Continue.Assign a role to the service account. If you don't have a custom role configured, the recommended starting point is Basic > Viewer, which grants read-only access to most resources. See Google Cloud's documentation for best practices on least-privilege roles.
Click Done — skip the "Grant users access to this service account" step.
5. Grant service account access to the Workload Identity Pool
Go to IAM & Admin → Service Accounts.
Click on the service account you created in step 4 (e.g.
strike-graph-integrations-service-account).Click the Principals with access tab at the top of the page.
Click Grant Access.
In the New principals field, paste the following, replacing
PROJECT_NUMBERwith the project number (again, not the project ID) you copied in step 1 andPOOL_IDwith the ID of the pool you created in step 3:principalSet://iam.googleapis.com/projects/PROJECT_NUMBER/locations/global/workloadIdentityPools/POOL_ID/*The trailing/*grants access to all identities in the pool.In the Select a role dropdown, search for and select Workload Identity User.
Click Save.
6. Download the credential configuration
From your Workload Identity Pool, click Connected Service Accounts.
Find the service account you created and click Download.
In the dialog, select the AWS provider you configured for Strike Graph, then click Download Config.
You will provide this credential configuration file to Strike Graph when completing the setup below.
Setting up the Integration in Strike Graph
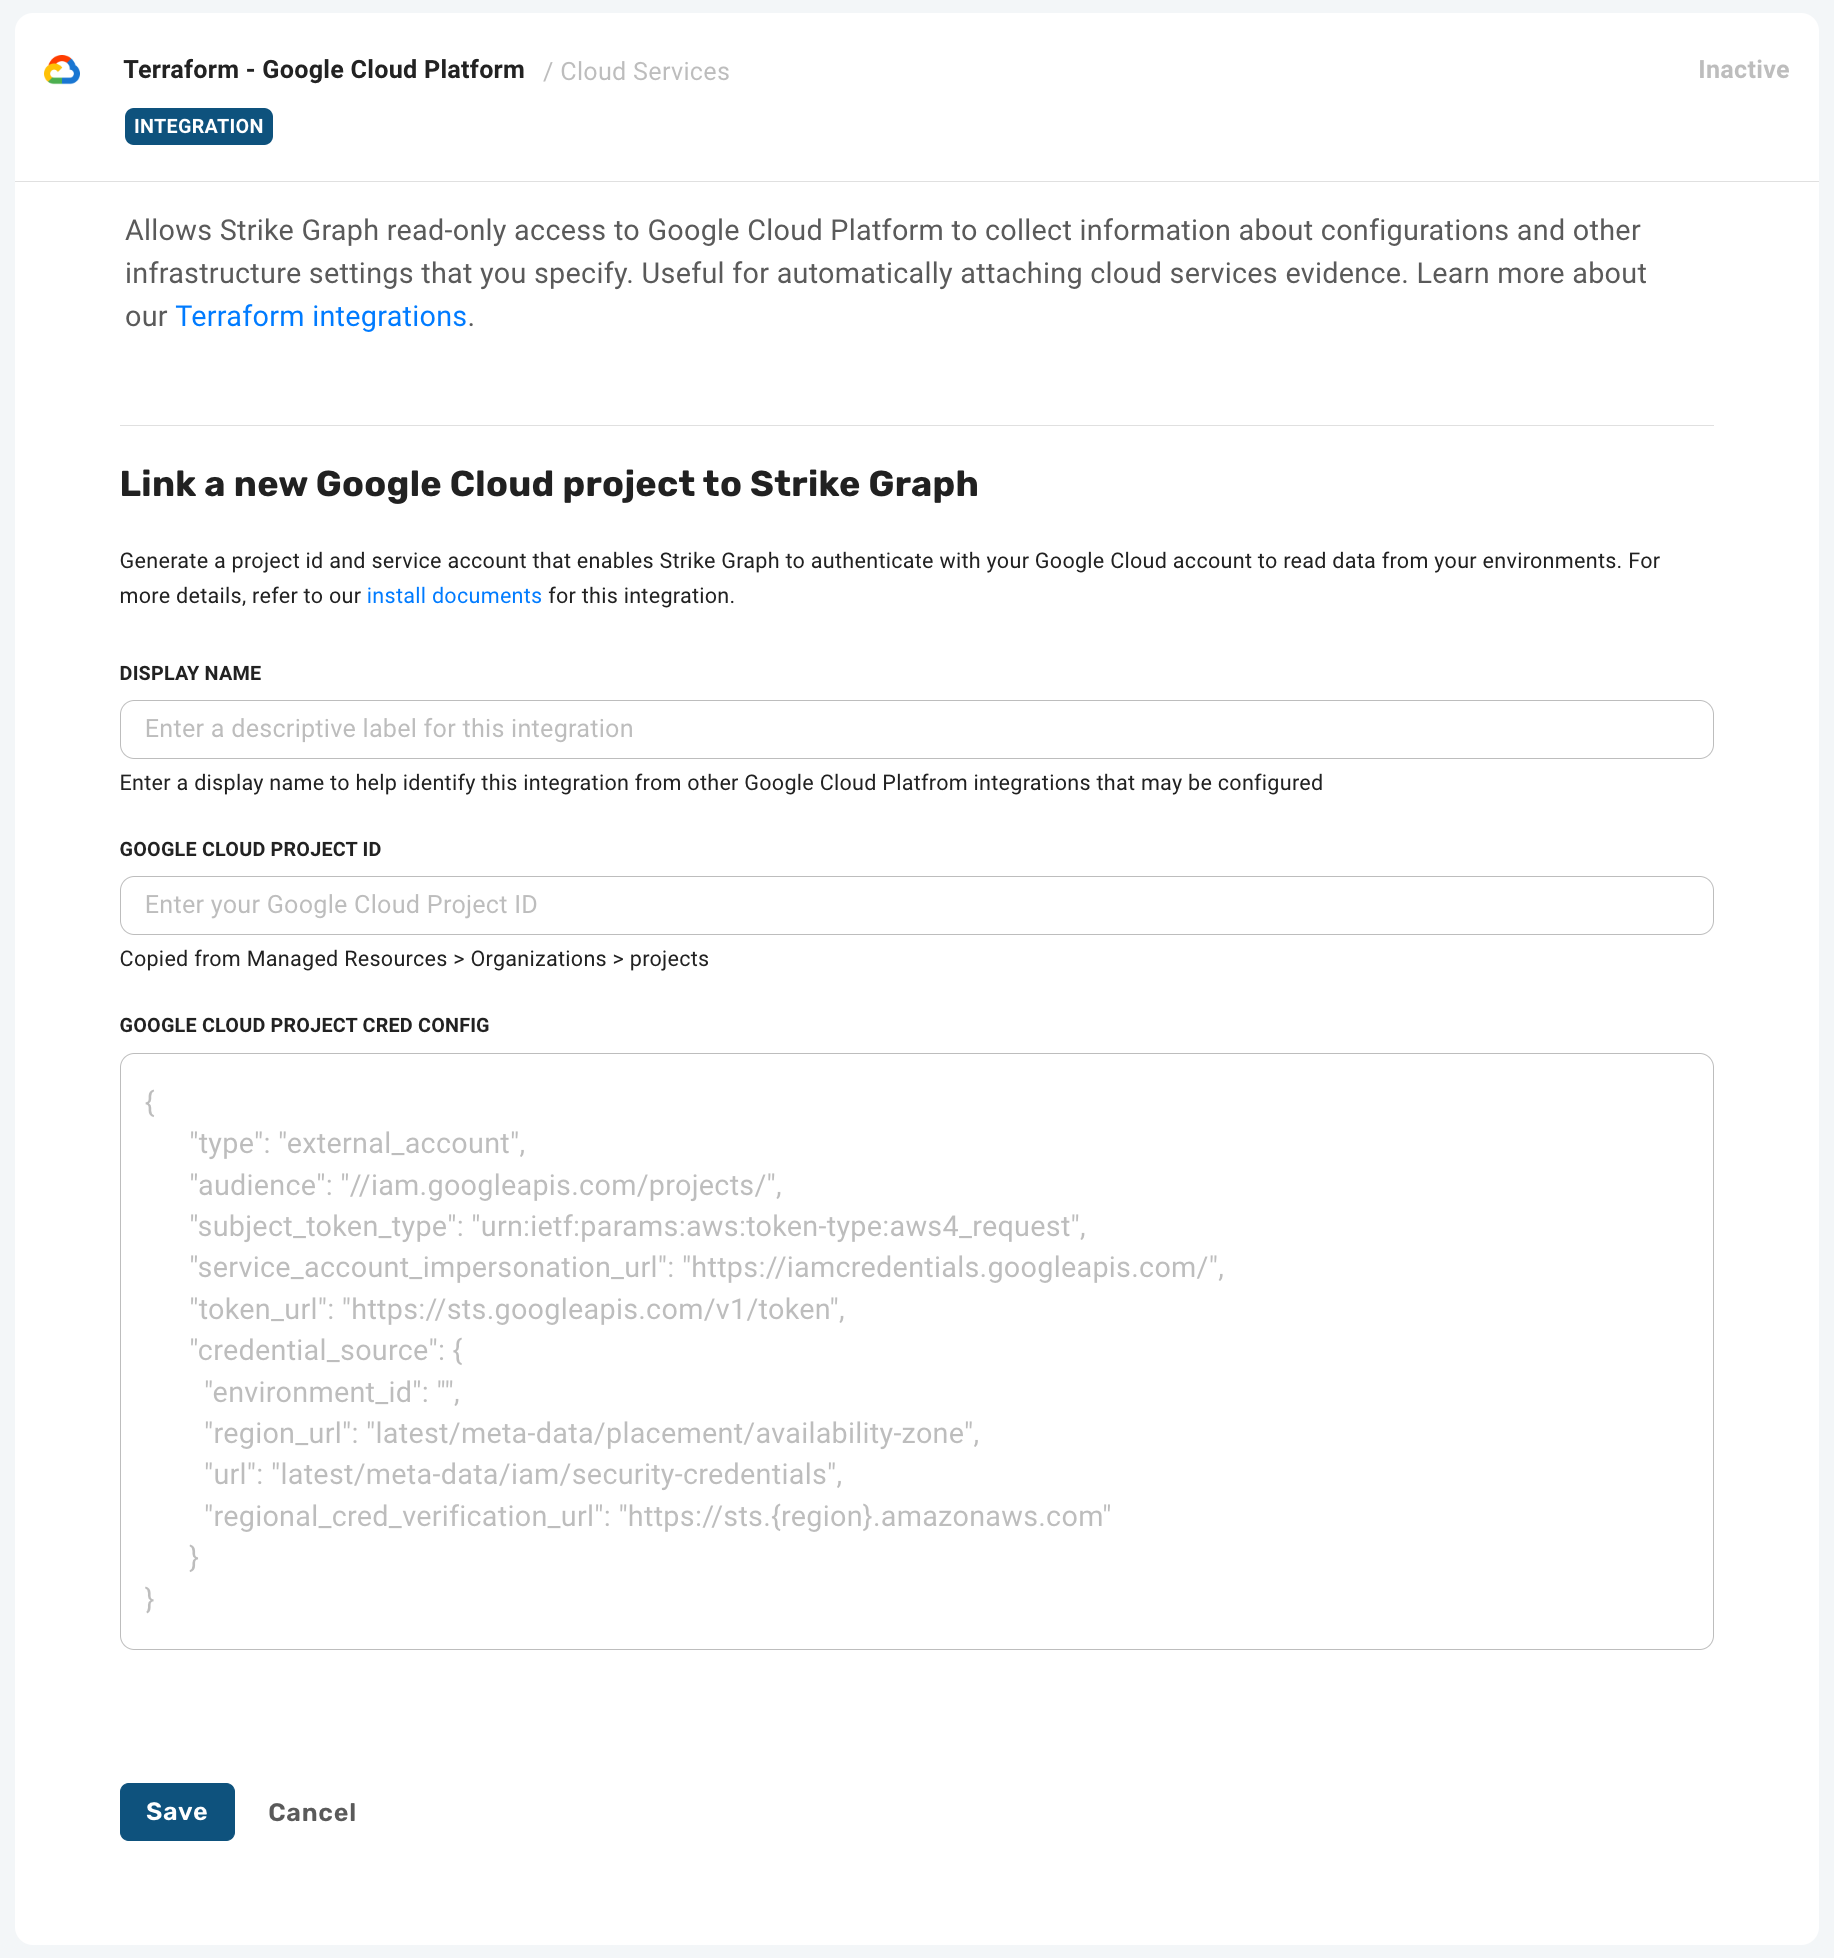
Back in the Strike Graph interface, fill in the following fields:
Display Name — Choose any unique name that helps you identify this integration (e.g., "Production GCP" or "GCP - Engineering Project").
Google Cloud Project ID — Enter the GCP project ID. This can be found in Manage Resources > Organizations > Projects in your Google Cloud Console, or at the top of any console page in the project selector.
Google Cloud Project Cred Config — Paste the entire credential configuration JSON you downloaded in the final step above.
Click Save to finalize the configuration. Strike Graph will validate your credentials and project ID before saving.
You can create as many GCP connections as you need to manage the scope of your integrations as necessary. Please note that everyone with access to your GRC organization will be able to use any configured GCP connections during evidence collection.
Collecting Evidence
Once you have configured a GCP integration, you can begin using it to collect evidence of your GCP resources and infrastructure.
Navigate in Strike Graph to the evidence item that you want to collect evidence for. Choose either Attach Directly for one-time evidence collection, or Automated Collection (recommended for ongoing compliance).
Click one of the options and select your Terraform & Scripts - Google Cloud Platform integration from the list. If you have configured multiple GCP integrations, make sure you select the one with the right permissions for the evidence you plan to collect.
The evidence collection interface has two tabs: Terraform and Scripts. Each tab represents a different method for collecting evidence, and you can use whichever approach best fits your workflow.
Method 1: Terraform Data Blocks
Terraform data blocks allow you to use a few lines of HCL code to define what data you would like to collect as evidence. More information about data blocks and local values can be found on the Terraform overview page.
With Terraform for Google Cloud Platform, you can collect evidence of GCP resources from any supported data source. A list of supported data sources is available at the bottom of this page, as well as on the Terraform GCP provider page (data sources are listed in the left-hand navigation).
The following describes how to use Terraform in 'Basic' mode. Please refer to this guide on using the Advanced mode.
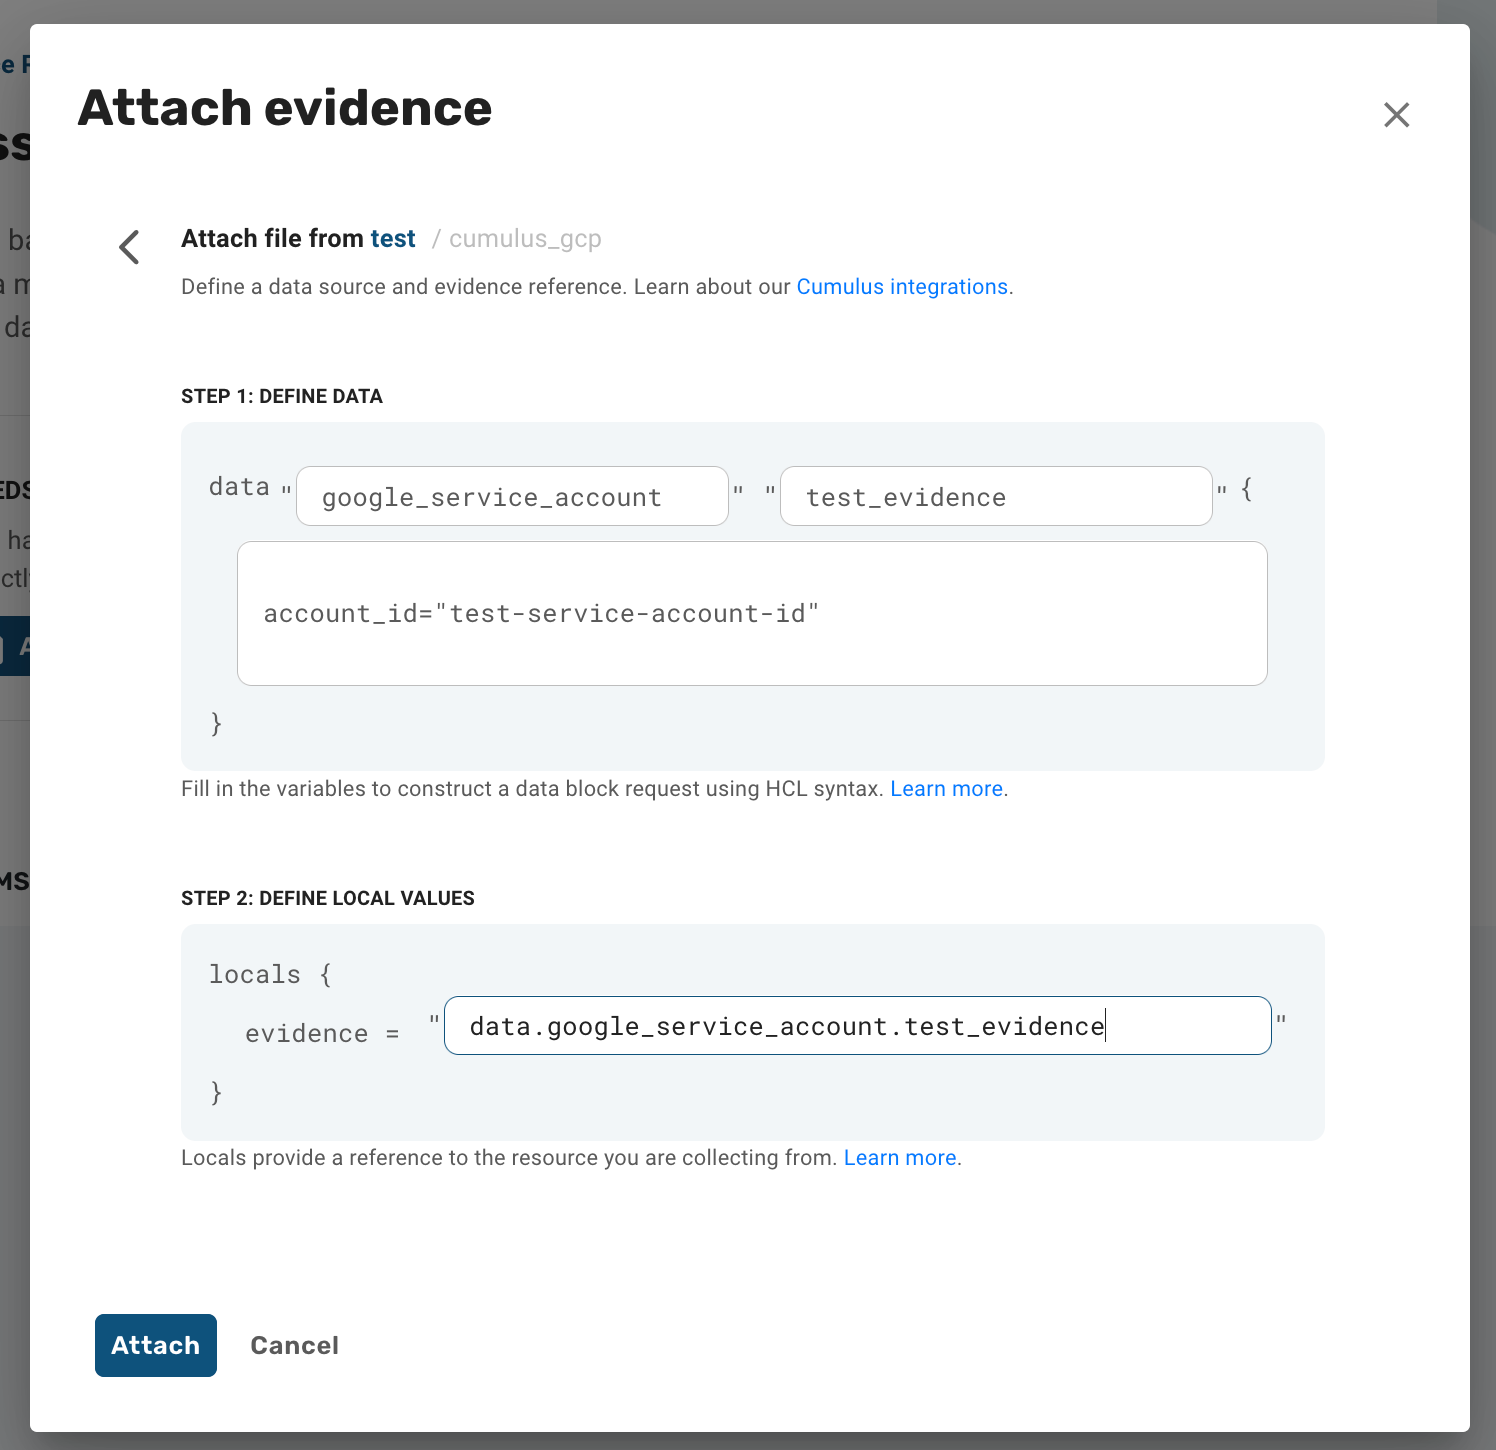
Step 1: Define the data block
Data blocks follow a typical pattern:
data_source — Defines which GCP resource to read from. Terraform for GCP supports data collection from any resource with a supported data source from Terraform's GCP provider (see list below).
temp_name — A temporary name you define that is used to refer to this data block during execution. It only has labeling significance within the scope of this configuration. The temp name is used in the output's filename, so it's recommended to choose something recognizable. Names can be repeated across configurations, are limited to alphanumeric characters, and do not allow spaces.
query constraints / arguments — Many data sources require specific argument(s) to be included (like the name or ID of the resource you're pulling data from), or provide methods for constraining the data based on specific queries. These are written as key/value pairs and can include multiple arguments as accepted by the data source. Refer to the specific data source requirements in the Terraform GCP provider documentation.
Step 2: Define local values
Define the local values used for execution. This follows a typical pattern derived from the data block: data.data_source.temp_name (sometimes followed by a specific key if a filter argument is desirable).
Step 3: Run the data collection
After you have defined the data block and local values, click Attach to execute the data collection. This may take a few minutes as we set up the data pipeline to collect the attachment.
Once the collection is finished, the attachment modal will close and the collected data will be added to the evidence item. You can confirm what was collected by clicking on the attachment to view the data.
Method 2: Script Runner
The Script Runner tab provides an alternative way to collect evidence using pre-built scripts that interact with Google Cloud's APIs and CLI tools. This is particularly useful for collecting evidence that isn't readily available through Terraform data sources, or when you want a point-and-click approach without writing any configuration code.
Scripts are curated and maintained by Strike Graph. Rather than defining a data block yourself, you search for a script that matches the evidence you're trying to collect, review it, and run it — Strike Graph handles the rest.
Step 1: Search for a script
When you open the Scripts tab, a search field will appear pre-populated with the name of your evidence item. Strike Graph uses this to surface the scripts most likely to be relevant to what you're collecting.
You can edit the search query at any time to refine the results. The search returns up to five matching scripts and updates as you type.
Each script result is shown as a card displaying:
Name — the script's descriptive title
Description — a brief explanation of what the script collects
Category — the type of compliance evidence the script is designed to support
Services — the specific GCP services the script interacts with
Step 2: Preview a script (optional)
Before running a script, you can click Preview on any script card to review its details and inspect the underlying source code. The preview panel shows the script's name, description, services, category, and the script source itself.
This is a good way to confirm that a script will collect the right evidence before executing it. Once you've reviewed the script, you can click Run Script directly from the preview panel, or click Back to results to return to the search list.
Step 3: Run the script
Click Run on a script card (or Run Script from the preview panel) to execute it. Strike Graph will run the script against your connected GCP project and attach the output directly to the evidence item.
While the script is running, you'll see a loading indicator with the script's name. Script execution may take up to a few minutes depending on the complexity of the data being collected. Once the run is complete, the modal will close and the collected data will appear as an attachment on the evidence item.
If no scripts match your search query, try using different keywords — for example, the name of the GCP service you want to collect evidence from (such as "IAM", "Cloud SQL", or "Storage").
Using Automated Collection
It is highly recommended that you configure your evidence collection with Automated Collection. With Automated Collection, Strike Graph can recollect evidence attachments from Google Cloud a few days before expiration so that your evidence remains in an effective 'audit ready' state.
To configure Automated Collection, follow the steps above after clicking the Automated Collection button found on the evidence item detail page. Additional information about Automated Collection is available here.
Removing your GCP Integration
You can remove the integration at any time. Please note that removing an integration does not delete any files that were previously attached using that integration. Removing an integration will also disrupt automated collection.
To remove:
Go to the Integrations Manager and click on the Terraform & Scripts - Google Cloud Platform card to access the integration configurations.
Click the Deactivate button next to your configuration.
Note: You may have access to remove integrations for other users on your team.
If you are fully removing access between Strike Graph and your GCP system, you may also wish to delete the Workload Identity Federation pool and service account you set up during configuration from the Google Cloud Console. Before deleting, verify that you are not using them for other purposes.
Troubleshooting
For additional Terraform troubleshooting tips, click here.
Terraform integrations will return an error if we were unable to execute the collection request. The errors returned will differ depending on which step of the collection failed.
Errors when setting up an integration
If you receive an error while setting up an integration, check for a specific error message at the top of the form. Possible errors include providing a project ID that's not associated with the credential configuration, or providing a malformed credential configuration (which would most likely be due to a copy+paste error).
General formatting errors
If the error message returned during evidence collection is generic (like "Something went wrong"), it may be a formatting issue. Check that your temp_name is formatted correctly (no spaces, only alphanumeric characters) and that there are no unexpected characters or formatting issues in the data block or local values.
Check permissions
If you receive a permissions error, ensure that you have given your service account the necessary read-only permissions to access the resource. The service account must have access to the specific GCP project and resources you are trying to collect evidence from.
Confirm the data_source requirements
Check that the resource you defined in the data_source is available from the GCP Terraform provider, and ensure that you have included any required query constraints / arguments.
Confirm the local values
Confirm that the local values are formatted correctly. Typically, the local value should start with data (as described above) and include the data_source and temp_name. Check that the data_source and temp_name values are the same between the data block and local values.
The list of supported Google Cloud Provider data sources
The following list is a snapshot of supported data sources from the GCP Terraform provider. For up-to-date support and specific data source requirements, visit the Terraform GCP provider documentation.
Access Approval
google_access_approval_folder_service_account
google_access_approval_organization_service_account
google_access_approval_project_service_account
App Engine
google_app_engine_default_service_account
Artifact Registry
google_artifact_registry_repository
BigQuery
google_bigquery_default_service_account
Cloud Build
google_cloudbuild_trigger
Cloud Composer
google_composer_environment
google_composer_image_versions
Cloud DNS
google_dns_keys
google_dns_managed_zone
google_dns_record_set
Cloud Functions
google_cloudfunctions_function
google_cloudfunctions2_function
Cloud IAM
google_iam_workload_identity_pool
google_iam_workload_identity_pool_provider
Cloud Key Management Service
google_kms_crypto_key
google_kms_crypto_key_version
google_kms_key_ring
google_kms_secret
google_kms_secret_asymmetric
google_kms_secret_ciphertext
Cloud Platform
google_active_folder
google_client_config
google_folder
google_project_service
google_iam_policy
google_iam_role
google_organization
google_project
google_project_organization_policy
google_projects
google_service_account
google_service_account_key
Cloud Pub/Sub
google_pubsub_subscription
google_pubsub_topic
Cloud Run
google_cloud_run_locations
google_cloud_run_service
Cloud SQL
google_sql_backup_run
google_sql_ca_certs
google_sql_database
google_sql_database_instance
google_sql_database_instances
google_sql_databases
Cloud Source Repositories
google_sourcerepo_repository
Cloud Spanner
google_spanner_instance
Cloud Storage
google_storage_bucket
google_storage_bucket_object
google_storage_bucket_object_content
google_storage_project_service_account
Compute Engine
google_compute_address
google_compute_addresses
google_compute_backend_bucket
google_compute_backend_service
google_compute_default_service_account
google_compute_disk
google_compute_forwarding_rule
google_compute_global_address
google_compute_global_forwarding_rule
google_compute_ha_vpn_gateway
google_compute_health_check
google_compute_image
google_compute_instance
google_compute_instance_group
google_compute_instance_group_manager
google_compute_instance_template
google_compute_network
google_compute_network_peering
google_compute_region_instance_group
google_compute_regions
google_compute_resource_policy
google_compute_router
google_compute_router_nat
google_compute_snapshot
google_compute_ssl_certificate
google_compute_ssl_policy
google_compute_subnetwork
google_compute_vpn_gateway
google_compute_zones
Container Registry
google_container_registry_image
google_container_registry_repository
Kubernetes (Container) Engine
google_container_cluster
google_container_engine_versions
Memorystore (Redis)
google_redis_instance
Secret Manager
google_secret_manager_secret
google_secret_manager_secret_version_access
Tags
google_tags_tag_key
google_tags_tag_value
Questions?
Reach out through our chat feature for real-time Customer Success support 8 am - 5 pm PT Monday through Friday.