Verify AI
Learn how to use Verify AI to automatically test your evidence items
Written By Micah
Whether you're prepping for audit or maintaining continuous compliance through control monitoring, your compliance program is only as good as the evidence you're able to collect.
With Verify AI, we've built a tool that automatically conducts an 'internal audit' of your evidence attachments as they're getting collected. This saves you and your team time by minimizing the need to manually check and confirm each attachment that is collected.
Instead, you can trust Verify AI to scan and review each document and flag for you the ones that need attention, helping focus your impact on where it's needed most.
Broadly speaking, Verify AI can test almost any file type, including test documents like PDFs or Word/Google docs; tabular data like CSVs or Excel sheets; text extracted from images like PNGs or JPGs; and configurations like JSON or XML.
How to configure Verify AI
Verify AI is included in Scale and Enterprise plans or as an add-on module for other plans. Once your organization has access to the feature, it can be easily enabled on any evidence item.

To enable Verify AI, navigate to the evidence's detail page and look for the Verify AI box under the evidence description. Click on the kabob-menu and select "Enable evidence testing" to turn it on for that evidence.
Please note: to enable Verify AI, you'll either need to have Manager permissions or be assigned as the owner for the evidence item.
Once Verify AI is enabled for the evidence item, it'll automatically process any new attachments that are collected for that evidence — including manual attachments or automated collection. You can also run (or re-run) tests for existing attachments by clicking on the kabob menu on the attachment card and selecting "Run test".

How to read Verify AI results
Verify AI currently tests attachments across two vectors:
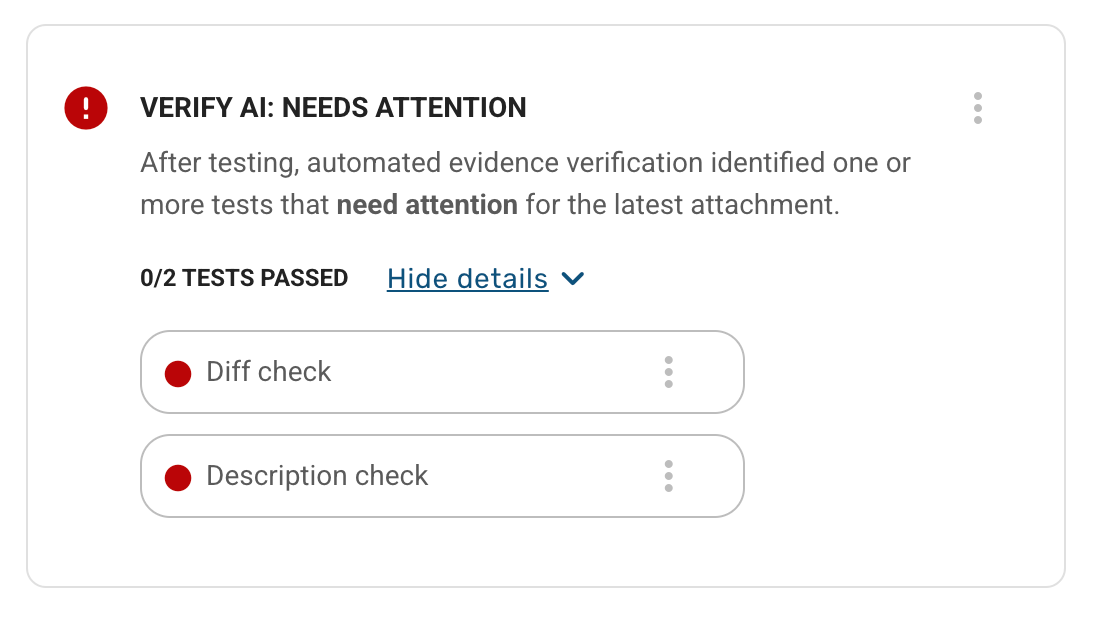
Changes between attachments (also known as the "Diff check")
Alignment to the evidence description (also known as the "Description check")
The most recent test runs will be visible inside the main Verify AI component. Click on the "Show details" link to expand the component to see the detailed results of the test runs.
The status of previous test runs can be seen on the attachment cards themselves; hover over the red, blue, or green bubbles on the attachments to see the results. Verify AI only displays the results from the last tests run for that attachment.
Passed, reviewed, and needs attention statuses
Test results can have one of four statuses:
Passed
Skipped
Needs attention
Reviewed
Passed (green) results mean that the attachment appears to meet the expected requirements of that test.
Skipped (gray) means that Verify AI was unable to successfully process the test on this specific attachment. This can periodically happen if the file is too large, some how locked or corrupted, or is an unsupported file type.
Needs attention (red) means that Verify AI flagged an issue with this attachment. Evidence owners are sent an email alert when Verify AI returns at least one needs attention test status. If Verify AI detects an attachment that needs attention, it also flips the evidence into a needs attention status as well.
Reviewed (blue) means that an evidence owner or organization Manager reviewed the needs attention results but deemed that the attachment was ultimately sufficient. This can be done by clicking on the kabob menu for a flagged test result and selected "Mark as reviewed". If all of the most recent test results are either Passed or Reviewed, the evidence's status will be flipped back into a green satisfied state.
Understanding the Diff check
The diff check performs a comparison between the attachment that is being processed and the attachment that was collected before it. This is designed to monitor for changes between collections, and flag the attachment if it appears to have changed significantly from the previous collection.
The threshold for changes is ~5% — this means that if the document has changed more than 5% then Verify AI will alert the evidence owner so that they can confirm that the changes are expected. For some document types, Verify AI will attempt to use semantic understanding of the changes to avoid alerting on semantically similar changes like grammar updates or rephrasing of policy statements.
Diff tests currently only support text-based documents, like PDFs, images, JSON, tabular data, and Word/Google documents.
Understanding the Description check
The description check is designed to check the alignment of the attachment's contents to the evidence's description. For this reason, it is a very powerful and flexible test, and can be customized to the needs of the evidence item and expected attachment collections.
With great flexibility comes a bit of trial and error. While many evidence descriptions will work with the description check straight out of the box, in some cases you may want to refine the description to be more (or less) specific.
With the Description check, Verify AI will attempt to share the reasoning for why the attachment passed or needs attention. You can use this feedback to refine the description for better test results. To see the reasoning from Verify AI, open the test details and hover over the Description check result. Verify AI will show a tool tip with feedback on the test's status.

If you edit the evidence's description, you can re-run the tests for the most recent attachment to see how your changes impact the results from Verify AI. This is a good way to ensure that you get the best results from Verify AI and avoid false positives/negatives.
Verify AI across your dashboards
Beyond the evidence detail page, Verify AI results surface in two other areas of Strike Graph so you can monitor testing health without drilling into individual evidence items.
Compliance Dashboard
If your organization has Verify AI enabled, a Verify AI Status widget appears on the Compliance Dashboard. The widget is tailored to your role:
Managers see a Verify AI Status widget that shows how many of the workspace’s active evidence items have Verify AI enabled, along with a segmented bar breaking results into Flagged, Reviewed, Passed, and Inactive statuses. Below the bar, individual evidence items with Flagged or Reviewed results are listed so you can quickly follow up on items that need attention.
Contributors see a Your Verify AI Status widget scoped to the evidence assigned to you. The widget shows a status bar for your Flagged, Reviewed, and Passed results, and lists your evidence items with expandable detail rows. Expand a Flagged or Reviewed item to see individual test results, reviewer notes, and status indicators for each test type.
Both widgets link directly to the Evidence Repository with the appropriate filters already applied.
Monitoring Dashboard
The Monitoring dashboard includes a dedicated Verify AI tab (visible to Managers) that provides a deeper operational view of Verify AI across your program. The tab contains:
Status tiles: summary counts for each Verify AI status bucket: Flagged, Reviewed, Passed, and Inactive.
Trend chart: a multi-line chart plotting Flagged, Reviewed, and Passed counts over time, with a toggle between 30-day and 90-day views.
By Owner table: a breakdown of Verify AI statuses by evidence owner, so you can see which team members have flagged items that need attention. The table is sortable by most flagged or by name.
Use the Verify AI tab on Monitoring to spot trends, identify owners who may need support, and confirm that flagged evidence is being reviewed in a timely manner.
General tips and guidance
Images
When verifying images, like screenshots, remember that Verify AI will review text extracted from the image, not necessarily the image itself. To get the best results, ensure that there are enough contextual labels present in the image for Verify AI to validate it against the evidence's description. At this time, Verify AI does not support diff checks between image attachments.
Evidence description refinement
The evidence description can be as specific or as general as you like, however it's best practice to ensure that the description has a clear goal in mind.
For instance: "Provide an Acceptable Use Policy" would likely return satisfied results but misses the opportunity to dig a little deeper. Instead, you could offer specifics that you expect to see in the Acceptable Use policy, such as "Provide an Acceptable Use Policy that contains guidance on how employees are allowed to use company provided assets."
Similarly, it's possible to get too specific and Verify AI may give false negatives. An evidence description like "Provide an Acceptable Use Policy that is 14 pages long with 5 sections, each containing 14 bullet points" is likely to return false negatives more often than not.
You can also refine the evidence description as you go. For instance, your Acceptable Use policy may be embedded into your Employee Handbook, and without this additional context, Verify AI may flag the document as an issue. Writing a description such as "Provide the Employee Handbook that includes the Acceptable Use policy describing the appropriate utilization of company assets" would be a good way of ensuring that Verify AI doesn't unexpectedly flag the document.
Other gotchas
Verify AI is currently unable to perform math equations and is similar unpredictable when asked to count.
Tabular data is supported and Verify AI can successfully verify a broad range of use cases.
While Verify AI does have knowledge of today's date, any checks with complex date requirements may have degraded results.
In rare occasions, page breaks may impact Verify AI's understanding of the flow of text. This is most noticeable in PDFs or other more static document types.
Verify AI is unaware of styling or formatting specifics, so it cannot successfully respond to Description checks that require that level of context.
Was this helpful?
Still need help? Share an idea